Galaxy Diagnostics screen Tool Fixer VIDEO GUIDE GALAXYSCREEN FIX GUIDE IAASTEAMPRO Keep ReadingMore Info Below
Galaxy Diagnostics screen Tool Fixer
Solve the problem of normalizing/Calibrating
the screen for Samsung devices
Launch Galaxy Diagnostics Tool script.bat to begin.
1. S9+ application.
2. Ghosted Mobile.
3. Burn data to ghosted mobile.
4. Just start fixing
All Automated Procedure
To Use the Samsung Galaxy Screen Diagnostic.

Galaxy Diagnostics screen Tool Fixer the program Usage Manual
This Specific Test was Carried Out on a new Galaxy S9 plus there is no screen
normalization
But this diagnostic tool can be used to repair other screens [models]
A black box or box made of wood or carton is need to place device
(You can make it yourself, preferably from wood)
No need to connect to the internet
The screen resolution of the printed phone must be a maximum of 1441
It is necessary that the phone charge exceeds 25% and the screen brightness
is the highest.
Second application: [Diagnostics screen Repair Operation]
The first step:
Turn on the new S9 plus phone used to withdraw editions and activate USB DEBUGGING + ADB
We choose option No. 1 in the application script S9 +
We note that an application called SecBurninProfiler has been installed in the phone
After installing the application, we disconnect the phone from the computer
The second step:
Make sure that the screen resolution of the S9 PLUS is (1440 x 2960)
Now we go to settings, then screen, then screen resolution
Then you can connect the printer to the phone and activate USB DEBUGGING + ADB 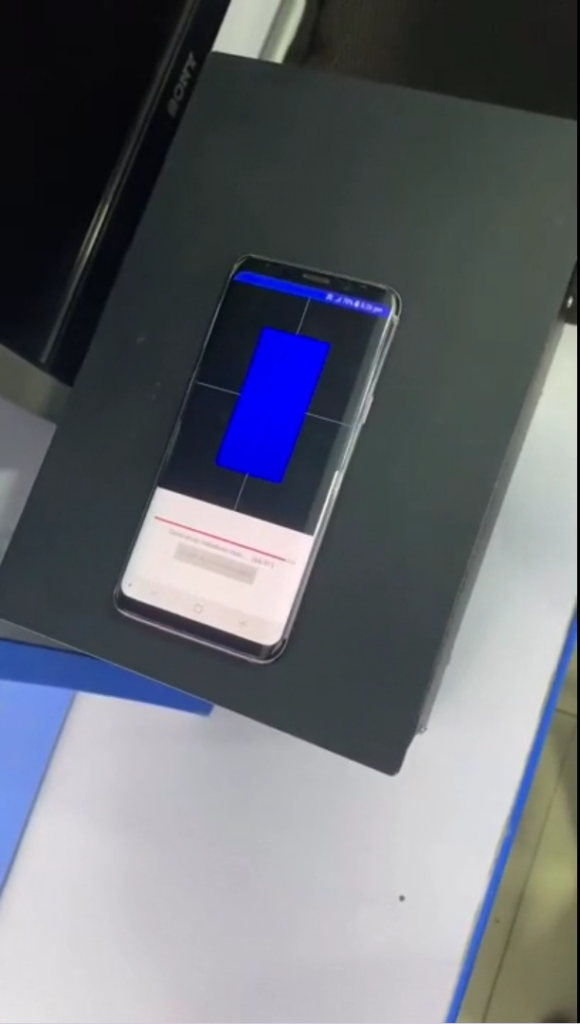
We make sure that the connection to the computer is complete and the permissions have been given
We choose option No.2in the script Ghosted Mobile
Galaxy Diagnostics 5.0.0.2 will be installed and will open an interface in the form of +
Now we move to the phone S9 plus and open the application that we installed previously
and do a scan for devices
The printed phone will appear to us,
so we will choose it and a message will appear in the printed phone
(Do you agree to call), then press OK
Note: If you encounter a connection problem, connect the two phones via Wifi Direct
Then log in to the SecBurninProfiler program
Now put the printed phone in the box and cover it
After you cover the printed phone in the box or box,
You go to the phone s9 plus and press start and place it over
the box opening and balance the cross in the phone with the printed phone
and start start
Then the files are transferred and when it is finished, it will show how the device was before and how it became
Now we connect the printed phone to the computer and choose the third option in the script data to ghosted mobile Burn
The icon with the name Cal.apply will be activated [Calibration and Diagnostic Repair Done]
We click on the icon and the installation bar for the required correction will appear on the screen
And congrats on the solution
Notes: [Galaxy Diagnostics screen Tool Fixer]
It is preferable that the walls of the box be made of cloth to control
the reflection of the light, andthe printed phone and
the phone S9 plus preferably be on the same straight and
parallel in one level when working