How to Create Samsung AutoPatch ROM Fix Firmware Self method Solved #Smali Patcher
Below is a step-by-step guide to using SmaliPatcherModule—the tool shown above—for safely patching your Android firmware/system images. You can copy-and-paste this into a txt file and follow the steps clearly

Introduction
SmaliPatcherModule is a Magisk-compatible utility that automates the process of applying custom patches to an Android device’s /system and /vendor partitions. Typical uses include disabling signature verification, faking locations, or bypassing OEM protections. This guide walks you through dumping your partitions, generating patched images, and flashing them back—without losing root access.
Prerequisites
Rooted Device with Magisk installed
ADB & Fastboot on your PC (Platform Tools)
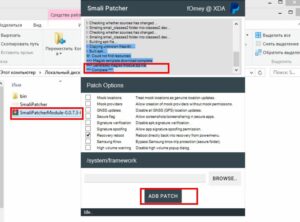
SmaliPatcherModule ZIP (e.g., SmaliPatcherModule-0.0.73-1.zip)
USB Debugging enabled in Developer Options
A Windows PC (this GUI is Windows-only)
Dumping Your System & Vendor Partitions
Connect your device via USB and open a command prompt.
Enter ADB shell with root privileges:
Navigate to your block devices:
Identify the vendor partition (e.g., sda26) and dump it:
Repeat for system if needed.
Use adb pull /sdcard/vendor.img . to copy the dump to your PC.
2. Preparing the Auto-Patch Package
Unzip your SmaliPatcherModule ZIP—inside you’ll find a system.img and vendor.img template.
Copy your dumped .img files over these templates, replacing them:
system.img ← your system dump
vendor.img ← your vendor dump
files folder of the module.
3. Generating the Patched Magisk Module
Open Smali Patcher GUI (SmaliPatcher.exe).
Under “Patch Options”, check the tweaks you want (e.g., disable signature verification, mock locations, secure flag, Samsung Knox bypass).
In the “/system/framework” field, click BROWSE… and select your patched module folder.
Click ADB PATCH. The tool will:
Copy your replaced images into a working folder
Run Magisk’s magisk --install-module logic to inject your patches
Output a new SmaliPatcherModule-Patched.zip in its output directory
4. Flashing the Patched Module
Transfer the patched ZIP to your device’s storage.
Reboot into Magisk Manager → Modules → Install from storage.
Select the patched ZIP and let Magisk install it.
Reboot your device.
5. Verifying & Troubleshooting
After reboot, open Magisk Manager → Modules → ensure SmaliPatcherModule is listed and active.
To confirm patches applied, enable the features (e.g., safe locations spoof) and test with appropriate apps (GPS spoofing app, signature-protected OEM app).
If you bootloop:
Re-flash Magisk’s uninstall ZIP via recovery (to restore stock).
Root again with stock Magisk.
Re-run SmaliPatcher on a clean dump and repeat the process.
Summary
Using SmaliPatcherModule simplifies advanced Android patching by automating dumps, module builds, and flashing—all through a GUI. Always keep backups of your original images and test each patch incrementally to avoid bricking your device.
Happy patching!